

Key Takeaways:
- Beginners should start with a cobbler cocktail shaker because it includes a built-in strainer and is the easiest way to make drinks at home or on a picnic.
- If you want to mix drinks faster like a professional, a Boston cocktail shaker is the best choice for high-volume use, even though you will need a separate strainer.
- To prevent your cocktail shaker from leaking or getting a stuck lid, choose an insulated model with a screw-top design that keeps drinks cold without making a mess.
There is nothing quite like the disappointment of reaching into a picnic tote only to find a sticky, leaking mess, or worse, realizing your much-anticipated martini is lukewarm and watery.
A quality cocktail shaker is the heartbeat of any mobile bar, serving three critical functions: it chills ingredients faster than any other method, blends disparate liquids like citrus and syrups into a cohesive whole, and provides the necessary aeration that gives drinks their “lift.”
In this guide, we introduce our “Mixology Match Menu.” Rather than just looking for any old bar tool, we believe you should match your gear to your specific moment, whether that is a high-volume backyard party or a quiet sunset at the park.
We are going to help you navigate common frustrations: leaking seals, lids that refuse to budge, and the struggle of measuring without a mess. By the end, you’ll know exactly what to bring on a picnic date to ensure your martini performs perfectly every time.
Quick Links:
- The Perfect Mixology Match Menu
- Understanding Common Shaker Styles
- Essential Features Checklist
- Our Top-Rated Recommendations
- Mastering Your Technique
- Keeping Your Equipment Spotless
- Pro Tips for Picnic Mixology
- Final Thoughts on Choosing Your Gear
- FAQs
The Perfect Mixology Match Menu
We treat barware like a menu board. You wouldn’t use a heavy cast-iron skillet for a delicate omelet, and you shouldn’t use a professional pro-speed set for a sandy beach picnic. Here is our recommended pairing guide:
- The Beginner Happy Hour: Classic cobbler with a built-in strainer for ease of use.
- The Tool-Light Picnic Kit: A mixing set with internal measuring marks.
- Two-Drink Speed Runs: Professional Boston tins for fast resets.
- Beach No-Mess Setup: An insulated screw-top model that won’t leak in a bag.
- Patio Drinks That Stay Cold: Double-wall designs that prevent “sweating.”
- The Gift Set: A multi-piece kit for someone building their first home bar.
We have selected five specific products that cover these exact scenarios, ensuring you have the right tool whether you are making the best picnic drinks for two or ten.
Understanding Common Shaker Styles
Choosing the right design is the first step toward better drinks.
- The Cobbler: This is the classic three-piece setup consisting of a main tin, a lid with a built-in strainer, and a small top cap. It is the gold standard for home enthusiasts because you don’t need extra tools.
- The Boston Set: This is a two-tin system (usually one large, one small). Pros love it because it’s faster to clean and has a larger capacity. However, when comparing a Boston shaker vs a cobbler, remember that the Boston requires a separate Hawthorne strainer.
- The Parisian (French) Design: A visual hybrid that looks like a cobbler but lacks the built-in strainer. It is elegant but less practical for a portable setup.
For most people, especially those taking their kit on the road, the Cobbler or an insulated modern variant provides the best balance of portability and function.
Essential Features Checklist
Before you pick a shaker, it helps to know what actually makes one work well in the real world. This checklist focuses on the features that prevent the biggest headaches, like leaks in your bag, lids that get stuck, and drinks that dilute too fast.
Reliable Seals and Leak Control
A leak-proof cocktail shaker is non-negotiable. Most messes occur due to a poor lid fit or a worn-out rubber gasket.
When looking for gear that won’t spill, we prioritize twist-lock or screw-top designs for outdoor use, as they provide a mechanical seal that won’t pop open if bumped in a picnic basket.
Dealing with Frozen or Stuck Lids
There is nothing more frustrating than a lid that refuses to budge. Metal contracts when it gets cold, which can vacuum-seal a shaker shut.
To fix this, we recommend models with textured grips or those made with thicker walls that resist extreme contraction. Always leave a little headspace and avoid “cranking” the lid on too tightly before you shake.
Integrated Straining Systems
A built-in straining system is essential for portability. While pros use a separate Hawthorne tool, we find that a cobbler-style shaker with a strainer built in is far superior for picnics.
It means one less tool to lose in the grass and one less item to wash later.
Internal Markings for Precise Measuring
Consistency is the secret to great mixology. Using a cocktail shaker with measurements, either etched on the inside or built into the lid, ensures you aren’t guessing.
This is particularly helpful for those seeking the best cocktail shaker for beginners, as it prevents wasted ingredients and ensures the third drink tastes as good as the first.
Double-Wall Insulation and Better Grip
An insulated cocktail shaker uses vacuum technology to keep ice from melting (reducing dilution) and preventing condensation.
A “no-sweat” exterior is much easier to hold and won’t leave rings on your picnic blanket.
Sanitizing and Caring for Your Gear
Always check if your gear is dishwasher safe. While most stainless steel is durable, painted finishes or rubber gaskets may require hand-washing.
We recommend removing any gaskets and letting the pieces air-dry completely to prevent odors from developing in the threads.
Our Top-Rated Recommendations
Now that you know the main styles and what to look for, here are the picks that match the moments in our Mixology Match Menu. To choose quickly, look at your Match Menu moment. If you are outdoors, go for insulation and screw-tops; if you are at home learning the ropes, a classic cobbler set is your best cocktail shaker choice.
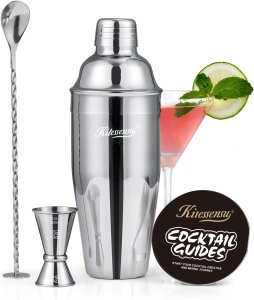
1. KITESSENSU 24oz Cobbler
This is the quintessential choice for those just starting out. It features a classic 3-piece design with a snug-fitting lid to prevent messes.
Rating: 4.7 
 based on 3,685+ reviews

Why It Fits:
- It comes with a complete starter kit, including a jigger and spoon, and is a dishwasher-safe option.
Watch-outs:
- The top can occasionally stick when very cold; give it a light tap on the side to release.
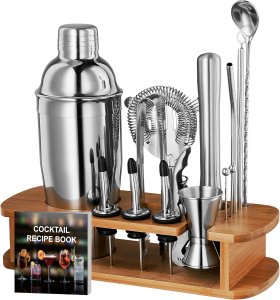
2. FineDine 17-Piece Kit
When you want to explore all types of bar tools at once, this set is a powerhouse. It bridges the gap between a home bar and a professional setup.
Rating: 4.6 based on 20,250+ reviews
Best For:
- Gifting or those who want a specialized tool for every possible recipe.
What’s Included:
- High-grade stainless steel that is easy to clean.
Watch-outs:
- It includes a lot of pieces, which might be overkill for a simple picnic.
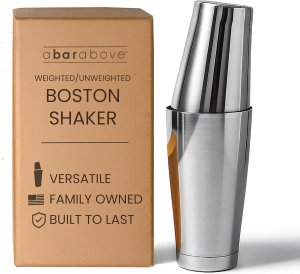
3. A Bar Above Boston Set
In the Boston shaker vs cobbler debate, this is the choice for those who want speed. It creates a professional seal that is easy to “crack” once the drink is chilled.
Rating: 4.7 based on 4,410+ reviews
Why Pros Like It:
- It allows for fast cleaning between drinks.
Good To Know:
- You will need to pack a separate Hawthorne strainer.
Watch-outs:
- There is a slight learning curve to achieving the perfect seal.
4. Simple Modern Insulated
This is our favorite insulated cocktail shaker for the patio. It solves the “stuck lid” and “frozen hands” problems simultaneously.
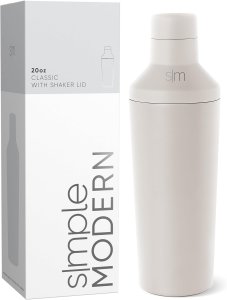
Rating: 4.5 based on 1,885+ reviews
Standout Features:
- A screw-top lid with a built-in strainer and measurements.
Why We Love It:
- No condensation means no slippery hands and no mess on your furniture.
Watch-outs:
- Ensure the gasket is seated correctly after washing to maintain the seal.
5. BrüMate 22oz
This is the most rugged, leak-proof cocktail shaker designed for serious travel.
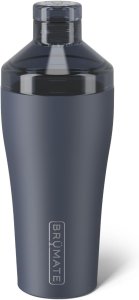
Rating: 4.7 based on 1,345+ reviews
Why It’s Great Outdoors:
- It features a splash-proof lid and built-in internal measuring marks.
Best Use
- Beach, pool, or boat trips where glass is a liability.
Watch-outs:
- The premium finish requires a bit more care than raw stainless steel.
Mastering Your Technique
Even the best shaker will disappoint if the seal is off or the shake is too gentle. This section breaks down the simple steps that make drinks colder, smoother, and more consistent every time.
Step-by-Step Instructions
- Add Ingredients: Pour your spirits, juices, and syrups into the tin first.
- Add Ice: Fill the tin 2/3 full with fresh ice.
- Seal It Up: For a cobbler, put the lid on firmly. For a Boston, give the top tin a firm tap to seat the seal.
- The Shake: Use two hands and shake vigorously for 15-20 seconds.
- Serve: Remove the cap (or add your strainer) and pour.
A general rule of thumb: if the drink contains citrus, dairy, or egg whites, you must shake it. If it is spirit-only (like a Negroni), you should stir it.
Shaking for 20 seconds achieves the same cooling as stirring for two minutes, making the cocktail shaker a much more efficient tool for a busy host.
Keeping Your Equipment Spotless
A clean shaker is not just about looks. It keeps flavors fresh, prevents sticky buildup, and helps seals and gaskets last longer. These tips make cleanup fast, especially when you are packing up after an outdoor pour.
- Rinse immediately after use to prevent sugar from hardening.
- Use mild soap and a soft cloth; avoid abrasive pads that scratch the finish.
- Air dry fully before reassembling.
Deep Cleaning and Odor Fixes
- Remove the gasket: If your equipment has a rubber ring, pop it out to clean the groove where bacteria hide.
- Baking soda soak: For stubborn odors, soak the tin in warm water and baking soda.
- Material Note: Most high-quality tools use Type 304 stainless steel. Ensuring your gear is dishwasher safe helps, but always air-dry completely.
Pro Tips for Picnic Mixology
To host a perfect outdoor happy hour, we recommend building a travel kit:
- The Main Tool: Choose a shaker and strainer combo for simplicity.
- The Measure: Use a leak-proof model with internal marks to save space.
- The Ice: Pack a dedicated cooler; we recommend the best 16 qt coolers for the perfect size.
- The Glassware: For a no-breakage day, look into disposable wine glasses or high-quality best wine glasses if you have a padded carrier.
- The Extras: Don’t forget a wipe cloth and a trash bag for spent citrus peels.
Remember to set up on a flat surface. If you are following our best beach picnic ideas, use a heavy-bottomed shaker to prevent it from tipping in the sand. For more preparation tips, see our picnic basket essentials checklist.
Final Thoughts on Choosing Your Gear
Choosing the right gear comes down to knowing your environment. If you want speed and pro-level results at home, the Boston tins are your friend.
If you want a mess-free sunset drink at the park, an insulated, leak-proof cobbler is the winner. Use our Match Menu to identify your style and commit to making one fresh cocktail this weekend. Your future picnic guests will thank you.
FAQs
Which type is best for a beginner?
The cobbler is the best cocktail shaker for beginners because it is a self-contained unit. It includes the mixing tin, a lid with a built-in strainer, and a cap that doubles as a measuring tool.
Do I need a separate strainer?
If you are learning pro techniques at home, a separate Hawthorne strainer is great. However, for portability, we recommend a model with a strainer built in.
Why does my lid get stuck?
Metal contracts when cold, creating a vacuum. This is why a lid that doesn’t get stuck is a top priority. To fix it, run warm water over the connection point or give the side of the tin a firm tap with the heel of your hand.
What makes a shaker truly leak-proof?
A leak-proof cocktail shaker usually features a silicone gasket or a screw-top lid. Traditional friction-fit models can leak if the metal is warped.
Is an insulated version worth the money?
Absolutely. An insulated model prevents condensation and keeps your ice from melting into a watery mess, which is vital for outdoor use.
Can these go in the dishwasher?
Most stainless steel models are dishwasher safe, but always check the manufacturer’s instructions for painted or plated finishes.
What is the difference between a Boston and a cobbler?
When comparing the Boston shaker vs the cobbler, the Boston is a two-piece system used by pros for speed, while the cobbler is a three-piece system with a built-in strainer designed for convenience.
Affiliate Disclaimer: This article contains affiliate links. We may earn a commission if you purchase through these links at no extra cost.